
Become part of the nation's fastest growing grassroots art movement!
There are 4 steps to joining The Louisiana Quilt Trail:
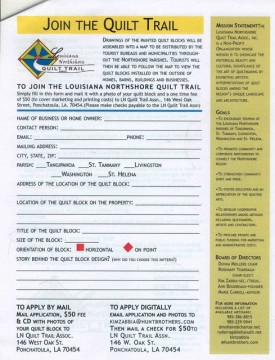
- Download and complete the Registration Form
- Return your Registration Form and $50 registration fee (check made payable to LN Quilt Trail Assn. Mail to 146 West Oak St., Ponchatoula, LA 70454)
- Approval from the board will begin as soon as possible, where we'll reserve your one-of-a-kind design. We'll notify you once your design has been approved
- Begin constructing your quilt square! The process for creating your quilt square are below.
Download registration form here!
Construct your own quilt block
You can join the Louisiana Northshore Quilt Trail if you create a block that will be located in the five parish region of Tangipahoa, St. Tammany, Livingston, St. Helena or Washington Parishes. Several Construction options for you:
- Paint a design on a 3/4" weather-worthy board (such as MDO Sign Board or metal) and hang the block on the outside of any structure such as your home, business, barn or fence.
- Paint the design directly on the surface of one of these structures like a mural
- Hang your block from an eave or place on a separate post in the yard
- Create your quilt block with found materials or mixed media. There is a beautiful block on our Trail that was sandblasted into plexiglass. In Louisiana, we love thinking outside the box.
Step 1: Design your Block
If you would like to paint your own block on wood, here is an easy step-by-step Process.
Design your block--with simple graph paper, you can draw a patchwork of triangles and squares to create your own special design. You can also google Quilt Trails and a gozillion traditional quilt patterns will appear. All quilts have a "back-story" so if there are, say, four triangles in the pattern, they might represent your four grandparents.
IMPORTANT SPECS TO REMEMBER WHEN YOU DESIGN YOUR BLOCK
- NO WORDS OR LOGOS ARE ALLOWED
- BLOCK MUST BE SQUARE
- BLOCK MUST BE AT LEAST 2'x2' OR LARGER
- DESIGN MUST "READ" AS A QUILT WITH EMPHASIS ON A PATCHWORK DESIGN. APPLIQUE' IDEAS ARE ACCEPTABLE.

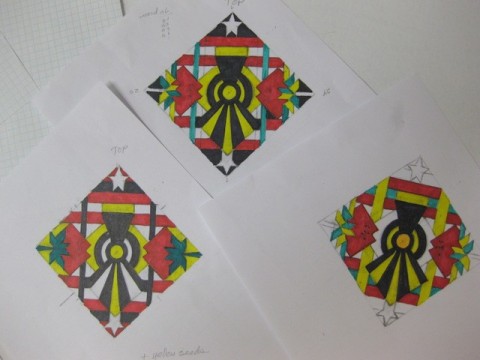
Step 2: Color your pattern
Choose your favorite colors and color your design using anything from colored pencils to crayons or markers. The color choice is up to you.
Step 3: Register with LNQT Association
STOP HERE AND REGISTER YOUR BLOCK WITH THE LOUISIANA NORTHSHORE QUILT TRAIL ASSOCIATION. Just like buying a domain name, if you register now, you can insure that your design will be the only one of its kind on our Louisiana Trail. Then you can take all the time you wish to complete your block since your design is your own.The Board will meet to approve your design and get in touch with you ASAP so you can continue. TO REGISTER, CLICK HERE.

Step 4: Buy materials
Ok, now that the Board has approved your design, you can feel comfortable purchasing your materials. If you are painting a quilt block to hang on an outdoor wall or stand freely in your yard, you’ll need these materials:
- 3/4” MDO board or metal (Quilt Blocks can be no smaller than 24” X 24”, but popular sizes are 36” X 36” and 48” X 48”)
- Primer such as Kilz or 1,2,3
- Spackling
- One Shot Sign Paint is our paint of choice here in Lousiana because One Shot means ONE COAT! It has really cut our painting time in half. It lasts longer than house paint, comes in smaller sizes than quart size and is cheaper per quilt. It dries to a glossy finish and is super easy to clean the block after it is installed.
- OR Exterior latex paint (1/4 of a Quart is plenty per color so share with your friends) (Refrain from buying the tiny "testers" since the pigment in them is not weather worthy.)
- Sponge brushes
- Frog tape (for clean lines)

Step 5: Prime the board
Now that you've purchased your materials, you're ready to spackle the edges where the top board meets the 2x2 frame. Again this is optional as well, but it's really wise to spackle the inside seam of the frame to discourage little critters from nesting in the cracks.
Next, prime the entire board front and back for the best possible sealer coat. It not only helps your board last longer, it gives you a white surface on which to draw your design.

Step 6: Draw design on board
Now it's time to draw your design on the front of the board itself. It's always wise to use a long straight edge and exact dimensions, so that your design comes out looking just like a patchwork quilt. Sorry, this is not a good time to "free draw".

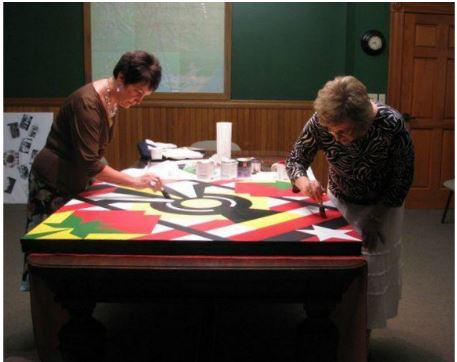
Step 7: Paint the design
Taping vs. Freehand: the debate continues. Some artists like to use Frog Tape for the straight edges which is really clean, but sometimes it takes longer to tape than to paint with a steady hand, and it's almost impossible nor time efficient to tape curves. If you're using latex exterior house paint, taping off one color means only painting that color, waiting four hours, painting the second coat, waiting four hours, painting a possibly needed third coat. And the time drags on and on. If you're using One Shot (one coat) Sign Paint as we do here in Louisiana, you can take off the tape after your one coat. Can't retape though until the next day after the other color has dried.
When you freehand, you can just keep painting till your knees cave in. You can get a coat of each color on the board before stopping. A reasonably steady freehander can paint a 4' X 4' quilt block within 8-10 hours depending on the number of pieces in the design: simpler the design, shorter the painting time. Some complex designs have taken up to 30 hours to paint, so keep that in mind if you're charging to do one for someone else or if you just want to stop at this point and hire someone else to paint it for you.
With exterior house paint, two coats of paint (with primer) are usually enough to cover the surface even though the really transparent colors (no white added), like pure red or orange, will require three if not more coats. (Red paint without primer may need 6-8 coats before you're satisfied. Spend that extra $2 and get the paint with primer. Who has that kind of extra time anyway?) Again, we suggest One Shot Sign Paint because it has really cut our painting time in half. The quilt blocks last longer than those painted with house paint, comes in smaller sizes than quart size and is cheaper per quilt. It dries to a glossy finish and is super easy to clean the block after it is installed.
AND so many people ask about a sealer over the finished painting. Remember, if you're using good exterior latex house paint on your house, would you seal your whole house with a poly coating once you're finished painting? Besides, a sealer may prevent you from making easy touch-ups in the future years as your quilt block ages. But, if you still want to seal it, go for it, but please use an acrylic sealer, not an oil-based one. AND One Shot paints do not need a sealer either.
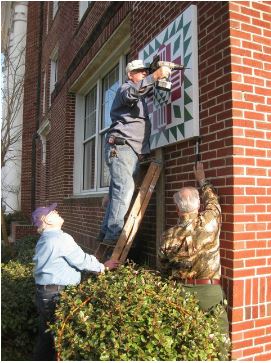
Step 8: Installation
If you have planned to mount your block on a wall, please consider how the block will be viewed by passers-by. Will the block be easily visible above parked cars or bushes? For the installation, you will need four 6" masonry bolts to drill through the four corners into the structure behind. You can put four more bolts in the block if you feel it would be more secure.
If your block will be nailed to a wooden structure, the installation will be stronger if the bolts continue through the outer substrate and reach a stud in the wall. If you are attaching the block to a brick wall, the bolts will go through the block and into the brick or stucco behind it. The hexagonal ends of the bolts show on the front of the block, but they are not distracting to the design. You can always paint over them if you wish. Some owners prefer to mount their blocks onto a 4 by 4 penetreated post so that the block can be erected in the yard where it will be more visible.
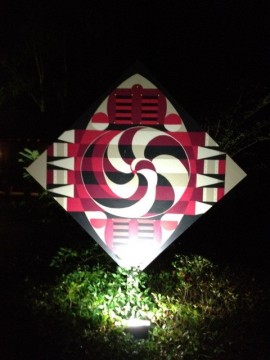
Tip: Consider Lighting
The quilts that are illuminated at night are a dramatic sight. Consider mounting a light that is wired to a sensor that automatically turns on at dusk and off at daybreak.
Last Step: Take a picture!
Congratulations! You are now ready to contact the Quilt Trail Board and let them know that your block is finally finished and installed. You can do that easily by clicking HERE. Thank you for supporting the Louisiana Quilt Trail!
